
ngIf是内置的结构型指令,控制宿主元素的添加或删除,取决于绑定的值是否为真。(跟vue的v-if是类似的,不是控制display属性)
单独使用ngIf
import { Component, OnInit } from '@angular/core';
@Component({
  selector: 'app-ng-if',
  template: `
    <div *ngIf="condition">condition为真是显示</div>
  `,
})
export class NgIfComponent implements OnInit {
  condition = true;
  ...
}
ngIf可以用于任何HTML元素。*ngIf是个语法糖,上个例子完整的写法如下:
import { Component, OnInit } from '@angular/core';
@Component({
  selector: 'app-ng-if',
  template: `
    <ng-template [ngIf]="condition">
      <div>condition为真是显示</div>
    </ng-template>
  `,
})
// **ng-template是一块内嵌模板,类型是TemplateRef。(跟vue的template类似)
export class NgIfComponent implements OnInit {
  condition = true;
  // ...
}
当然,我们平时根本就不着这么写,简写*ngIf足矣。
配合ngIfElese使用
import { Component, OnInit } from '@angular/core';
@Component({
  selector: 'app-ng-if',
  template: `
    <button class="btn btn-primary btn-small" (click)="condition = !condition">切换condition</button>
    <div *ngIf="condition; else elseBlock">condition为真是显示</div>
    <ng-template #elseBlock>
      <div>condition为假是显示</div>
    </ng-template>
  `,
})
export class NgIfComponent implements OnInit {
  condition = true;
  ...
}
这里需要注意的是:上面例子中的elseBlock并非组件中的某变量,而是TemplateRef的引用。(不带#)
使用TemplateRef
上面示例中的else后面跟的变量都是模板的引用而非组件中的变量,下面演示怎么用组件中的变量:
// 1、引入TemplateRef、ViewChild
import { Component, OnInit, TemplateRef, ViewChild } from '@angular/core';

@Component({
  selector: 'app-ng-if',
  template:  `
    <button class="btn btn-primary btn-small" (click)="condition = !condition">切换condition</button>
    <div *ngIf="condition; else elseBlocks">condition为真是显示</div>
    <ng-template #otherTel>
      <div>condition为假是显示</div>
    </ng-template>
  `,
})
export class NgIfComponent implements OnInit {
  condition = true;
  // 2、生命一个TemplateRef类型的变量
  elseBlocks: TemplateRef<any> = null;
  // 3、将页面上的引用为otherTel的template赋值给变量otherTemplate。
  // @ViewChild() 现在可以理解为:是获取页面元素的一种方式,后面会详细介绍
  @ViewChild('otherTel', { static: true }) otherTemplate: TemplateRef<any> = null;

  // ...

  ngOnInit(): void {
    // 4、给声名的变量elseBlocks赋值为otherTemplate
    this.elseBlocks = this.otherTemplate;
  }
}
问:为什么我们需要使用变量的形式来进行条件筛选呢?
答:相较于模板的引用,变量的形式可以更加灵活。我们可以根据不同的需求,给elseBlocks赋予不同的值,而模板引用的形式只能是写死的一段内容。
ngSwitch是内置的结构型指令,控制显示哪个模版,类似js中的switch
...
@Component({
  selector: 'app-ng-switch',
  template: `
    <p>
      <input type="radio" name="fruit" value="apple" id="apple" [(ngModel)]="fruit" />
      <label for="apple">🍎</label>
    </p>
    <p>
      <input type="radio" name="fruit" value="pear" id="pear" [(ngModel)]="fruit" />
      <label for="pear">🍐</label>
    </p>
    <p>
      <input type="radio" name="fruit" value="other" id="other" [(ngModel)]="fruit" />
      <label for="other">other</label>
    </p>
    选择的水果: {{ fruit }}
    <div class="content" [ngSwitch]="fruit">
      <p *ngSwitchCase="'apple'">这是苹果</p>
      <p *ngSwitchCase="'pear'">这是梨</p>
      <p *ngSwitchDefault>啥都不是</p>
    </div>
  `,
})
export class NgSwitchComponent implements OnInit {
  fruit = '';
  // ...
}
这个其实比较简单,但是需要注意写法:[ngSwitch]="变量"*ngSwitchCase="'字符串'"
NgForOf
ngForOf,列表渲染,对比vue,跟v-for类似
基础用法
import { Component, OnInit } from '@angular/core';
const Heros: Hero[] = [
  {id: 'hero_0', name: '盖伦'},
  {id: 'hero_1', name: '赵信'},
  {id: 'hero_2', name: '嘉文'},
  {id: 'hero_3', name: '易大师'},
];
interface Hero {
  id: string;
  name: string;
}

@Component({
  selector: 'app-ng-for',
  template: `
    <ul>
      <li *ngFor="let item of heros">{{ item.id }}</li>
    </ul>
  `,
})
export class NgForComponent implements OnInit {
  heros: Hero[] = Heros;
  //...
}
1、*ngFor=""
2、let * of * (vue使用的是:in)
局部变量
NgForOf 导出了一系列值,可以指定别名后作为局部变量使用:
$implicit: T:迭代目标(绑定到ngForOf)中每个条目的值。ngForOf: NgIterable<T>:迭代表达式的值。当表达式不局限于访问某个属性时,这会非常有用,比如在使用 async 管道时(userStreams | async)。index: number:可迭代对象中当前条目的索引。count: number:可迭代对象的长度。first: boolean:如果当前条目是可迭代对象中的第一个条目则为 true。last: boolean:如果当前条目是可迭代对象中的最后一个条目则为 true。even: boolean:如果当前条目在可迭代对象中的索引号为偶数则为 true。odd: boolean:如果当前条目在可迭代对象中的索引号为奇数则为 true。
...
@Component({
  selector: 'app-ng-for',
  template: `
    <ul>
      <li *ngFor="let item of heros; let f = first; let l = last; count as len; index as i; let e = even; odd as o">
        <p>first: {{ f }} -- last: {{ l }}</p>
        <p>name: {{ item.name }}</p>
        <p>length: {{ len }}</p>
        <p>index: {{ i }}</p>
        <p>even: {{ e }}</p>
        <p>odd: {{ o }}</p>
        <hr />
      </li>
    </ul>
  `,
})
...
从上面可以看出,局部变量可以采取let及as方式赋值,使用时用变量名。
trackBy
NgForOf会对DOM做出相应的修改。但是,如果其中有内容根本没有发生变化呢?我们是不需要全部更新修改DOM的,从而节省开销。trackBy就是解决这个问题的法宝。trackBy接收一个函数,返回 ngFor应该跟踪的值(比如id),这样刷新列表时,id相同的dom不会触发更新我们将前面的heros数组第二跟第四条数据修改下:
@Component({
  selector: 'app-ng-for',
  template: `
    <button class="btn btn-primary" (click)="reset()">重置</button>
    <ul>
      <li *ngFor="let item of heros; trackBy: trackByHero ">{{ item.name }}</li>
    </ul>
  `,
  styles: [
  ]
})
export class NgForComponent implements OnInit {
  heros: Hero[] = Heros;
 // ...
  reset() {
    this.heros = [
      {id: 'hero_0', name: '盖伦'},
      {id: 'hero_4', name: '赵信2'},
      {id: 'hero_2', name: '嘉文'},
      {id: 'hero_5', name: '易大师2'},
    ]
  }
  trackByHero(hero: Hero) {
    return hero.id;
  }
}
页面效果如下:
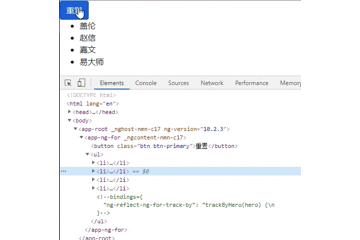
当我们点击重置的时候,可以看出,第一条跟第三条数据,页面是没有更新的,从而达到节约开销的作用。
总结
其实这一节的难度不是很大,需要注意一下几点:
1、*ngIf="condition"
2、[ngSwitch]="变量" *ngSwitchCase=""
3、*ngFor="let * of *"
4、局部变量的使用可以让我们的程序更简便
5、trackBy很重要


最新评论