
属性型指令
属性型指令用于改变一个 DOM 元素的外观或行为,不会改变 DOM 结构。
组件是一种特殊的指令
为了验证这一点,我们来修改一点我们以前app-ng-for组件的代码:
// ng-for.component.ts
// 修改组件里selector为属性选择器形式(我们之前说过,这里的值就是一个选择器而已)
@Component({
  selector: '[app-ng-for]',
  // ...
})
接下来,我们修改下调用组件的方式:
// app.component.html
// 我们将div作为指令的宿主,app-ng-for作为一个属性即可
<div app-ng-for></div>
经过上面的改动,发现ng-for组件依然可以正常运行。从而证明了,组件是一种特殊的指令。
自定义属性型指令
1.cli在src/directives下自动生成highLight指令(当用户把鼠标悬停在一个元素上时,改变它的背景色):
ng g d directives/highlight
来看一下生成的默认代码:
// highlight.directive.ts
import { Directive } from '@angular/core';
@Directive({
  selector: '[appHighlight]'
})
export class HighlightDirective {
  constructor() { }
}
可以看出,代码结构跟组件类似,使用了@Directive装饰器,传入的selector的值是属性选择器。并且,在app.module.ts中被自动引入:
// app.module.ts
import { HighlightDirective } from './directives/highlight.directive';
...
@NgModule({
  declarations: [
    // ...
    HighlightDirective
  ],
  // ...
})
...
2. 使用:
<!-- app.component.html -->
<p appHighlight>Highlight me!</p>
3.实现指令:
首先,我们先分析下步骤:
- 找到我们要操作的DOM元素;
- 给元素添加鼠标移入移出事件;
-
修改传入的任意背景颜色;
首先,我们先来解决前两个问题:
import { Directive, ElementRef, HostListener } from '@angular/core';
@Directive({
  selector: '[appHighlight]'
})
export class HighlightDirective {
  constructor(private el: ElementRef) { }
  @HostListener('mouseenter') onMouseEnter() {
    this.highlight('yellow');
  }
  @HostListener('mouseleave') onMouseLeave() {
    this.highlight(null);
  }
  private highlight(color: string) {
    this.el.nativeElement.style.backgroundColor = color;
  }
}

对于第三个问题,我们需要使用输入属性来传值:
import { Directive, ElementRef, HostListener, Input } from '@angular/core';
@Directive({
  selector: '[appHighlight]'
})
export class HighlightDirective {
  @Input() highlightColor: string;
  // ...
  @HostListener('mouseenter') onMouseEnter() {
    this.highlight(this.highlightColor);
  }
  // ...
}
<!-- app.component.html -->
<p appHighlight highlightColor="blue">Highlight me!</p>
以上,我们实现了我们全部需求。
ngNonBindable
使用由模板引擎原生支持的 ngNonBindable 伪指令,可以让 Angular 不对模板中的表达式进行求值。
如果把 ngNonBindable 应用于某个父元素,就会在它的所有子元素上禁用插值和任何类型的绑定比如属性绑定或事件绑定。
不过,ngNonBindable 仍然允许指令作用于受ngNonBindable影响的元素上。
<!-- app.component.html -->
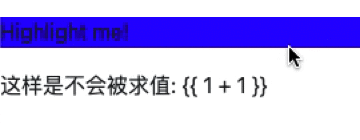
<p ngNonBindable appHighlight="blue">Highlight me!</p>
<p ngNonBindable>这样是不会被求值: {{ 1 + 1 }}</p>
页面显示效果:
结构型指令
结构型指令的职责是 HTML 布局。会改变 DOM 结构,以星号(*)加指令的属性名作为标识
在正式了解结构型指令前,我们需要先了解一点基本知识。
星号(*)前缀
前面,我们了解过最常见的内置结构指令ng-if、ng-for。他们都是以星号(*)开始,为什么呢?
我们来做一个简单的示例来解释下这个“语法糖”:
<!-- app.component.html -->
<div *ngIf="hero" class="name">{{hero.name}}</div>
<!-- 上面的写法展开后就是下面的写法:-->
<ng-template [ngIf]="hero">
  <div class="name">{{hero.name}}</div>
</ng-template>
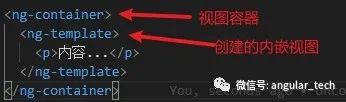
<ng-template>元素
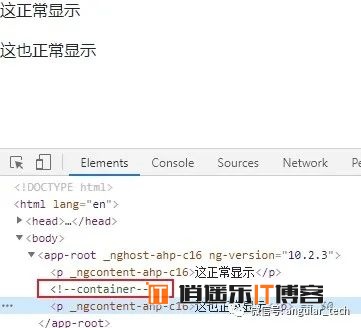
<ng-template>是一个 Angular 元素,用来渲染 HTML。它永远不会直接显示出来。事实上,在渲染视图之前,Angular 会把 <ng-template> 及其内容替换为一个注释。
<!-- app.component.html -->
<p>这正常显示</p>
<ng-template>
  <p>这个不能显示</p>
</ng-template>
<p>这也正常显示</p>
页面效果:
问:为什么移除而不是隐藏?
答:对于资源占用较多的组件,当隐藏掉一个元素时,组件的行为还在继续 —— 它仍然附加在它所属的 DOM 元素上, 它也仍在监听事件。这对于性能和内存方面是不利的。
<ng-container>元素
创建unless指令
我们将创建一个叫UnlessDirective 的结构型指令,它是 NgIf 的反义词。NgIf 在条件为 true 的时候显示模板内容,而 UnlessDirective 则会在条件为 false 时显示模板内容。
ng g d directives/unless
大概可以理解成这样:
但是,我们要怎么让Angular创建上面那一块代码呢?请看下面代码:
// unless.directive.ts
// 引入TemplateRef、ViewContainerRef
import { Directive, TemplateRef, ViewContainerRef } from '@angular/core';
@Directive({
  selector: '[appUnless]'
})
export class UnlessDirective {
  // 构造函数中注入TemplateRef、ViewContainerRef
  constructor(
    private templateRef: TemplateRef<any>,
    private viewContainer: ViewContainerRef
) { }
}
这一步是将属性型指令转换为结构型指令重要一步。
调用:
<!-- app.component.html -->
<div>
  <h3>unless 结构型指令</h3>
  <p *appUnless>测试uless指令</p>
</div>
目前为止,我们unless这个结构型指令已经可以正常运行,但是,还没有功能。接下来,我们将通过传入的condition来动态渲染内容。
// unless.directive.ts
import { Directive, Input, TemplateRef, ViewContainerRef } from '@angular/core';
...
export class UnlessDirective {
  private hasView = false; // 视图是否已经显示
  @Input()
  set appUnless(condition: boolean) { // set用来监听属性变化
    if (!condition && !this.hasView) { // 传入的条件为false并且视图没有显示
      // 创建一个内嵌的视图,并把这个视图插入到一个视图容器中
      this.viewContainer.createEmbeddedView(this.templateRef);
      this.hasView = true;
    } else if (condition && this.hasView) {
      this.viewContainer.clear();
      this.hasView = false;
    }
  }
  // ...
}
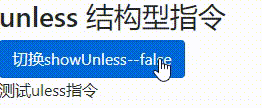
<!-- app.component.html -->
<div>
  <h3>unless 结构型指令</h3>
  <button class="btn btn-primary" (click)="showUnless = !showUnless">切换showUnless--{{showUnless}}</button>
  <p *appUnless="showUnless">测试uless指令</p>
</div>
// app.component.ts
...
export class AppComponent {
  showUnless = false;
}
...
页面效果:
至此,我们这个指令的基础功能已经实现。(作为基础,掌握到这个地步即可,如果你想给指令设置别名,请往下看)
首先,我们要实现的功能是这样的,设置别名un,并且在内部能直接使用:
<p *appUnless="showUnless; let un">测试uless指令---{{un}}</p>
修改unless.directive.ts:
// unless.directive.ts
...
export class UnlessDirective {
  @Input()
  set appUnless(condition: boolean) {
    if (!condition && !this.hasView) {
      // 创建视图时,传入第二个参数即可
      this.viewContainer.createEmbeddedView(this.templateRef, {$implicit: condition});
      // ...
    }
  }
  // ...
}
总结
1. 创建指令命令:ng g d 指令名
2. 属性型指令不改变 DOM 结构,结构型指令会改变
3. 使用 @HostListener 装饰器订阅宿主事件
4. ngNonBindable 下的子元素会禁用所有的插值和绑定
5. 结构型指令以星号(*)开始
6. 注入TemplateRef、ViewContainerRef是结构型指令的关键


最新评论