
准备工作
CommentService 、 UserService 抽离成单独的文件,以便多处使用。ng g s components/router-study/comment/comment
ng g s components/router-study/user/user
// comment.service.ts
@Injectable()
export class CommentService {
  constructor() { }
  getComments(): Observable<Comment[]> {
    return of(COMMENTS);
  }
  // 根据Id匹配数据
  getComment(id: number | string): Observable<Comment> {
    return this.getComments().pipe(
      map((comments: Comment[]) => comments.find(comment => comment.id === +id))
    );
  }
}
需求分析
- 点击每条评论跳转评论详情页面;
-
详情页返回列表页时,高亮显示点击后的评论。
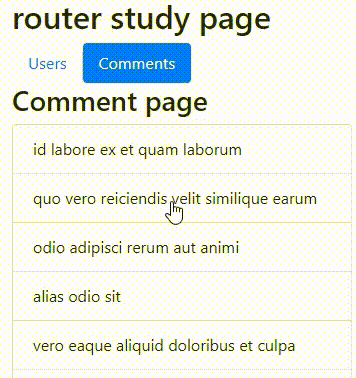
comment 组件(注:已将上节创建的评论列表组件 comment.component 改为 comments.component ):创建详情组件
ng g c components/router-study/comment/comment --flat -t -s -c OnPush
--flat 参数表示直接在comment文件夹下面创建组件,不将文件放在单独的文件夹中。
配置路由:
// router-study-routing.module.ts
{path: 'comment/:id', component: CommentComponent}
routerLink
routerLink: string | any[]上节我们通过添加 routerLink 属性实现了组件之间的跳转:
<a class="nav-link" routerLink="/comments" routerLinkActive="active">Comments</a>
按照这个思路,我们来试一下直接在字符串后面添加 id :
// comments.component.ts
template: `
    <h3>Comment page</h3>
    <ul class="list-group">
      <li
        class="list-group-item"
        [class.active]="item.id === selectedId"
        *ngFor="let item of comments\$ | async"
        (click)="onSelected(item.id)"
        [routerLink]="'/comment/' + item.id"
      >
        {{ item.name }}
      </li>
    </ul>
  `,
不出意外,这样果然行得通。那 routerLink 的值是数组呢?
[routerLink]="['/comment', item.id]"

点击之后,一样可以实现跳转。我们可以得出结论:绑定数组时,会拼接数组的每一项,且中间用’/‘分割
获取详情数据
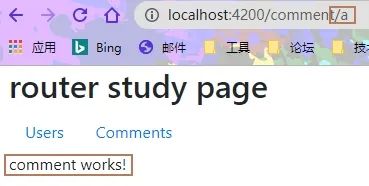
url中id参数,这里我们就要用到 ActivatedRoute 这个接口。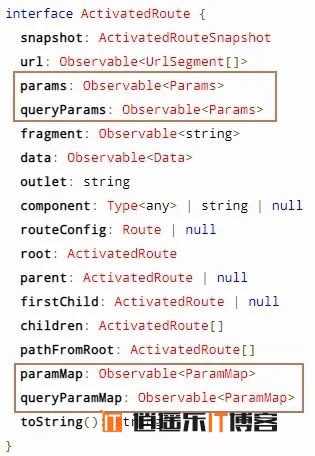
params 有关的属性,他们都是 Observable 类型。constructor 中注入:// comment.component.ts
constructor(private route: ActivatedRoute) { }
params:
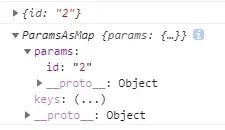
打印 params 、 paramMap:
this.route.params.subscribe(res => console.log(res));
this.route.paramMap.subscribe(res => console.log(res));
id 值,从而获取详情:// comment.component.ts
export class CommentComponent implements OnInit {
comment\$: Observable<Comment>;
constructor(private route: ActivatedRoute, private commentServer: CommentService) { }
ngOnInit(): void {
// 使用params获取id
// this.comment\$ = this.route.params.pipe(
// switchMap( params => this.commentServer.getComment(params.id))
// );
// 使用paramMap获取id
this.comment\$ = this.route.paramMap.pipe(
switchMap(paramMap => this.commentServer.getComment(paramMap.get('id')))
);
}
}
Map 类型的数据需要使用 get() 获取。<div class="card" style="width: 18rem;">
<div class="card-body" *ngIf="comment\$ | async as comment; else noneComment">
<h5 class="card-title">{{comment.name}}</h5>
<h6 class="card-subtitle mb-2 text-muted">{{comment.email}}</h6>
<p class="card-text">{{comment.body}}</p>
<hr>
<button class="btn btn-primary" routerLink="/comments">返回</button>
</div>
</div>
<ng-template #noneComment>没有comment内容</ng-template>
 上面已经实现基础功能,但是返回的时候并没有高亮上次选择的数据。我们来解决这个问题。在列表页面要知道上次选择的数据,我们需要将当前
 id 回传。可以用上面介绍的方式,很容易就能做到。但是,这里我们换一种方式传递参数:<button class="btn btn-primary" [routerLink]="['/comments', {id: comment.id}]">返回</button>
URL 地址变成了这样的格式: http://localhost:4200/comments;id=4 。 使用分号 “;” 间隔了参数。params 、 paramMap 获取到 id :// comments.component.ts
ngOnInit(): void {
this.comments\$ = this.route.params.pipe(
switchMap(params => {
this.selectedId = +params.id;
return this.commentServer.getComments();
})
);
// 或者这样:
// this.comments\$ = this.route.paramMap.pipe(
// switchMap(paramsMap => {
// this.selectedId = +paramsMap.get('id');
// return this.commentServer.getComments();
// })
// );
}
queryParams:
前面不是还有个 queryParams 、 queryParamMap 一直没用吗? 既然是 query 开头的属性,那URL 中连接参数的分隔符必然是“?”。所以,那就试试吧~
query 参数:[routerLink]="'/comments?id=' + comment.id"
URL 会转译成这样: http://localhost:4200/comments%3Fid%3D3 ,导致错误。所以,我们需要另一个输入性属性 queryParams :<button class="btn btn-primary" routerLink="/comments" [queryParams]="{id: comment.id}">返回</button>
query 参数: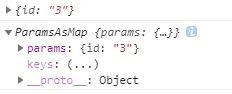
snapshot:
URL 中的参数,我们还可以使用 snapshot 。当我们的 URL 是这样的格式: http://localhost:4200/comment/2?id=a
snapshot :console.log(this.route.snapshot);
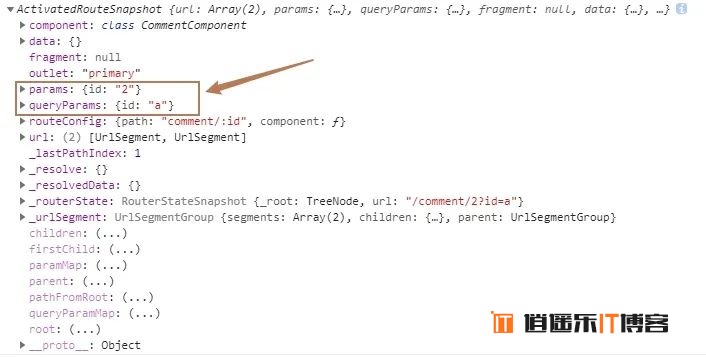 这样,我们可以同时拿到所需要的
 params 、 queryParams ,操作简单很多。编程式跳转
routerLink 进行跳转,我们还可以使用编程式的跳转。Router
URL 能力的 NgModule。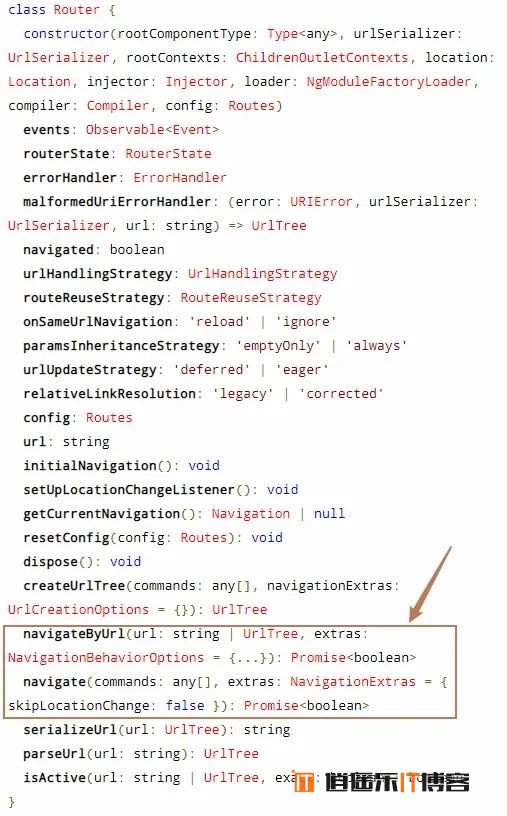
navigateByUrl() 、 navigate() 进行跳转:navigateByUrl()
语法:navigateByUrl(url: string | UrlTree, extras: NavigationBehaviorOptions): Promise<boolean>
interface UrlTree {
  root: UrlSegmentGroup
  queryParams: Params
  fragment: string | null
  queryParamMap: ParamMap
  toString(): string
}
先来个简单的例子:
<h3>Comment page</h3>
<ul class="list-group">
  <li
    class="list-group-item"
    [class.active]="item.id === selectedId"
    *ngFor="let item of comments\$ | async"
    (click)="toComment(item.id)"
  >
    {{ item.name }}
  </li>
</ul>
navigateByUrl() 是基于所提供的URL进行导航,必须使用绝对路径。
// comments.component.ts
toComment(id: number): void {
  this.router.navigateByUrl('/comment/' + id).then(r => console.log(r));
}
传递 query参数:
goBack(id: number) {
  this.router.navigateByUrl('/comments?id=' + id)
}
navigate()
语法:navigate(commands: any[], extras: NavigationExtras = { skipLocationChange: false }): Promise<boolean>
// comments.component.ts
toComment(id: number): void {
  this.router.navigate(['/comment', id]).then(r => console.log(r));
}
query 参数:goBack(id: number) {
this.router.navigate(['comments'], {queryParams: {id}}).then(r => console.log(r));
}
总结
- 可以使用
routerLink及函数式用方法进行跳转; - 两种方式传递
query参数都需要使用queryParams; - 使用
ActivatedRoute.snapshot能够快速获得路由此刻的一系列信息。
本文转载自:岩弈,版权归原作者所有,本博客仅以学习目的的传播渠道,不作版权和内容观点阐述,转载时根据场景需要有所改动。


最新评论