什么是路由
单页应用中,组件时构建应用的基础元素,页面展示什么内容均是靠页面有什么组件决定的,而展示什么组件又是由一组路由(带有Url元素的特定集合,可用于导航视图)决定的,希望本文可以帮助大家了解路由的基础概念和基础使用、写法。
任何一个前端框架,页面路由是绕不过的话题。从现在开始,介绍 angular 路由。
准备工作
在 src/app 下创建一个 data 文件夹储存数据。
// src/app/data/data.type.ts
export interface Comment{
  postId: number;
  id: number;
  name: string;
  email: string;
  body: string;
}
export interface User {
  id: number;
  name: string;
  username: string;
  email: string;
}
// src/app/data/data.ts
import { Comment, User } from './data.type';
// 数据来自http://jsonplaceholder.typicode.com/comments
export const Data: Comment[] = [
  {
    postId: 1,
    id: 1,
    name: 'id labore ex et quam laborum',
    email: 'Eliseo@gardner.biz',
    body: 'laudantium enim quasi est quidem magnam voluptate ipsam eos\\ntempora quo necessitatibus\\ndolor quam autem quasi\\nreiciendis et nam sapiente accusantium'
  }
  ...
]
// 数据来自http://jsonplaceholder.typicode.com/users
export const USERS: User[] = [
  {
    id: 1,
    name: 'Leanne Graham',
    username: 'Bret',
    email: 'Sincere@april.biz'
  }
  ...
]
创建一个 router-study 模块, --routing 表示生成相应的路由配置文件(xxx.routing.module.ts):
ng g m components/router-study --routing
app.module.ts 中配置 router-study 模块:// app.module.ts
...
@NgModule({
declarations: [
AppComponent
],
imports: [
BrowserModule,
RouterStudyModule,
AppRoutingModule
],
bootstrap: [AppComponent]
})
RouterStudyModule 应该放在 AppRoutingModule 前面。因为我们会在 AppRoutingModule 中配置设置通配符路由,不然可能会出现拦截路由的问题。ng g c components/router-study -s -t -c OnPush
ng g c components/router-study/comment -s -t -c OnPush
ng g c components/router-study/user -s -t -c OnPush
ng g c components/not-found -s -t -c OnPush
router-study 中调用 comment 、 user 组件:// router-study.component.ts
template: \`
<div class="container">
<h2>router study page</h2>
<app-comment></app-comment>
<app-user></app-user>
</div>
\`
app 组件中调用 router-study :<!--app.component.html--> <app-router-study></app-router-study>
comment 、 user 组件内容。
配置路由
RouterModule 和 Routes 导入到你的路由模块中。router-study 模块时 cli 工具已经自动导入:// router-study-routing.module.ts 自动生成内容:
import { NgModule } from '@angular/core';
import { Routes, RouterModule } from '@angular/router';
import {UserComponent} from './user/user.component';
import {CommentComponent} from './comment/comment.component';
const routes: Routes = [];
@NgModule({
imports: [RouterModule.forChild(routes)],
exports: [RouterModule]
})
export class RouterStudyRoutingModule { }
routes 数组中就行。const routes: Routes = [
{path: 'comment', component: CommentComponent},
{path: 'user', component: UserComponent},
];
Routes 还有更多配置项。// router-study.module.ts
template: \`
<div class="container">
<h2>router study page</h2>
<ul class="nav nav-pills">
<li class="nav-item">
<a class="nav-link" routerLink="user" routerLinkActive="active">Users</a>
</li>
<li class="nav-item">
<a class="nav-link" routerLink="/comment" routerLinkActive="active">Data</a>
</li>
</ul>
<router-outlet></router-outlet>
</div>
\`,
-
routerLink配置跳转路径,相对路径、绝对路径都可; -
routerLinkActive:当前a标签激活状态时所添加的class样式名(也就是点击所添加的class)。 -
router-outlet:占位元素,展示所激活路由内容。

tips: 上面这一切请确保项目中index.html 头部中有 <base href="/"> 。如果你是用cli 工具自动生成的项目则无需考虑,会自动添加。
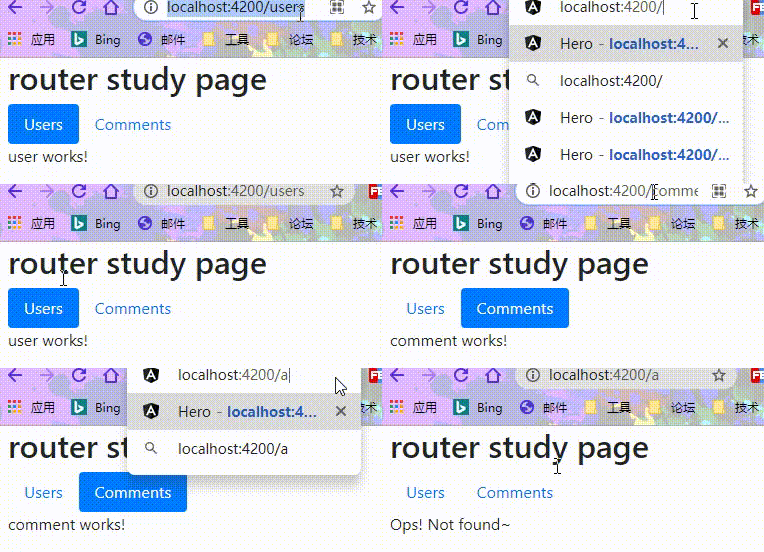
设置通配符路由
-
当用户打开页面,我们想要直接显示 users 组件的内容,所以需要配置重定向路由。 -
当用户试图导航到那些不存在的页面时,我们应该让程序处理跳转到404页面,所以需要配置通配符路由。
// app-routing.module.ts
...
const routes: Routes = [
  {path: '', redirectTo: '/users', pathMatch: 'full'},
  {path: '**', component: NotFoundComponent }
];
@NgModule({
  imports: [RouterModule.forRoot(routes)],
  exports: [RouterModule]
})
...
Router 在匹配路由时使用“先到先得”策略,所以有明确路径的路由因该放在前面,否则会直接走到通配符路由而不能到达期望路由。这也是将 RouterStudyModule 放在 AppRoutingModule 之前的原因。-
redirectTo:重定向路径。以此达到默认显示user组件内容的目的。 -
pathMatch: 路径匹配策略,为 “prefix” 或 “full” 之一。默认为“prefix”。默认情况下,路由器会从左边开始检查 URL中的各个元素,以查看此 URL 是否匹配给定的路径,遇到任何一个匹配的,就停止。比如,'/team/11/user' 能匹配 'team/:id'。“
full” 表示与整个URL匹配。重定向空路径路由时,执行此操作很重要。否则,因为空路径是任何URL的前缀,所以路由器即使在导航到重定向目标时也会进行重定向,从而造成无限循环。

组件添加数据
// comment.component.ts
import {Component, OnInit, ChangeDetectionStrategy, Injectable} from '@angular/core';
import {Observable, of} from 'rxjs';
import {COMMENTS} from '../../../data/data';
import {Comment} from '../../../data/data.type';
import {map} from 'rxjs/operators';
// 注册获取数据的服务
@Injectable()
class CommentService {
  getComments(): Observable<Comment[]> {
    return of(COMMENTS);
  }
  // 根据Id匹配数据
  getComment(id: number | string): Observable<Comment> {
    return this.getComments().pipe(
      map((comments: Comment[]) => comments.find(comment => comment.id === +id))
    );
  }
}
@Component({
  selector: 'app-comment',
  template: \`
    <h3>Comment page</h3>
    <ul class="list-group">
      <li
        class="list-group-item"
        [class.active]="item.id === selectedId"
        *ngFor="let item of comments\$ | async"
        (click)="onSelected(item.id)">
        {{ item.name }}
      </li>
    </ul>
  \`,
  styles: [\`
    .list-group{width: 340px;}
    .list-group-item{cursor: pointer;}
  \`],
  changeDetection: ChangeDetectionStrategy.OnPush,
  providers: [CommentService]
})
export class CommentComponent implements OnInit {
  comments\$: Observable<Comment[]>;
  selectedId: number;
  constructor(private commentServer: CommentService) { }

  ngOnInit(): void {
    // 直接获取Observable
    this.comments\$ = this.commentServer.getComments();
  }
  onSelected(id: number): void {
    this.selectedId = id;
  }
}
user 组件同理async pipe

总结
- 为了项目结构优化,建议
app-routing中仅提供需要全局作用的配置,其他路由在各自routing文件中配置; - 重定向路由,需要将路由匹配策略设为'
full'; angular中路由占位符是router-outlet标签;async管道可以订阅一个Observable,从而简化代码。


最新评论