
ViewChild与ViewChildren来获取DOM元素、组件、指令。在这之前,我们需要先了解一个Angular的生命周期函数AfterViewInit
AfterViewInit
定义:一个生命周期钩子,会在 Angular 完全初始化了组件的视图后调用。
在组件中注入这个钩子函数后,就必须实现它的方法ngAfterViewInit()。(不用担心,编辑器会提示你的)
ngAfterViewInit()
一个回调方法,它会在 Angular 完成了组件视图的初始化逻辑之后立即调用。在视图初始化完成之后,它只会调用一次。
@ViewChild()
DOM中查找能匹配上该选择器的第一个元素或指令。如果视图的DOM发生了变化,出现了匹配该选择器的新的子节点,该属性就会被更新。通俗的来讲,就是Angular 中的‘选择器’,能及时的获取模板中的元素(DOM元素、组件、指令)。
元数据说明
ViewChild可以有三个参数:selector- 用于查询的指令类型或名字。read- 从查询到的元素中读取另一个令牌。static- 如果为true,则在更改检测之前解析查询结果;如果为false,则在更改检测之后解析查询结果。默认为false。
tips:我们将新建一个view-child组件来展示本节全部代码
获取普通DOM
修改view-child组件html代码:
<!-- view-child.component.html -->
<section>
  <h3>获取dom</h3>
  <div class="box" #box>
    <p>box</p>
  </div>
</section>
提醒:上面代码给class名为box的div添加了#box标识,这样的作用有点类似给元素添加了一个id值。
ViewChildComponent这个类注入AfterViewInit这个钩子函数:// view-child.component.ts
export class ViewChildComponent implements OnInit, AfterViewInit {}
AfterViewInit,并且实现ngAfterViewInit这个接口。// view-child.component.ts
import { AfterViewInit, Component, OnInit } from '@angular/core';
...
export class ViewChildComponent implements OnInit, AfterViewInit {
constructor() { }
ngAfterViewInit(): void {}
ngOnInit(): void {}
}
#box来判断constructor、ngAfterViewInit、ngOnInit调用时机:// view-child.component.ts
import { AfterViewInit, Component, ElementRef, OnInit, ViewChild } from '@angular/core';
...
export class ViewChildComponent implements OnInit, AfterViewInit {
// 定义私有属性boxEl,是ElementRef类型。
@ViewChild('box') private boxEl: ElementRef;
constructor() {
console.log('constructor', this.boxEl);
}
ngAfterViewInit(): void {
console.log('ngAfterViewInit', this.boxEl);
}
ngOnInit(): void {
console.log('ngOnInit', this.boxEl);
}
}

可以得出结论:
- 三个函数调用顺序是:
constructor>ngOnInit>ngAfterViewInit; - 默认在变更检测之后才会获取到元素,而
ngAfterViewInit就是在变更检测之后才会调用。
tips: 所谓变更检测,大概意思是Angular每次更新视图前会去检测内部逻辑的变化,只更新有变化的部分。
static属性
上面的示例中默认在变更检测之后才会获取到目标元素,可开启static,这样组件初始化的时候,变更检测前就能获取到目标
// view-child.component.ts
...
export class ViewChildComponent implements OnInit, AfterViewInit {
  // 定义私有属性boxEl,是ElementRef类型。
  @ViewChild('box', { static: true }) private boxEl: ElementRef;
  ...
}
这样,在ngOnInit和ngAfterViewInit阶段都能获取到页面的元素了:

获取子组件(指令)
以组件为例,获取到组件实例后可以访问子组件到属性和方法,指令用法和组件一摸一样。
在view-child下面创建一个panel组件:
ng g c components/view-child/panel -s
// panel.component.ts
...
export class PanelComponent implements OnInit {
  readonly name = 'panel component';
  ...
}
view-child组件调用:
<!-- view-child.component.html -->
<app-panel></app-panel>
<app-panel #panel></app-panel>
获取组件:
// view-child.component.ts
import { PanelComponent } from './panel/panel.component';
...
export class ViewChildComponent implements OnInit, AfterViewInit {
   // 方法1: 引入PanelComponent组件,ViewChild直接获取PanelComponent
   @ViewChild(PanelComponent, {static: true}) private panelInstance: PanelComponent;
   // 方法2: 引入PanelComponent组件,ViewChild直接获取PanelComponent
   @ViewChild('panel', {static: true}) private panelInstance2: PanelComponent;
   ...
  ngAfterViewInit(): void {
     // 既然是组件的实例,那么,我们就能访问组件里面的属性及方法
     console.log(this.panelInstance.name); // panel component
     console.log(this.panelInstance2.name); // panel component
  }
}
获取组件中的DOM元素
首先在子组件的构造函数中注入el:
// panel.component.ts
...
export class PanelComponent implements OnInit {
  constructor(readonly el: ElementRef) { }
  ...
}
获取:
// view-child.component.ts
...
export class ViewChildComponent implements OnInit, AfterViewInit {
  ngAfterViewInit(): void {
    console.log(this.panelInstance.el.nativeElement);
  }
  ...
}
@ViewChildren()
与ViewChild类似,它可以批量获取模板上相同选择器的元素并存放到QueryList类中。ViewChildren没有static属性。
批量获取DOM元素
模版有三个#box的元素:
<!-- view-child.component.html -->
<section>
  <p class="box" #box>box1</p>
  <p class="box" #box>box2</p>
  <p class="box" #box>box3</p>
</section>
获取:
// view-child.component.ts
import { QueryList} from '@angular/core';
...
export class ViewChildComponent implements OnInit, AfterViewInit {
// 定义私有属性boxEls,是ElementRef组成的QueryList类型。
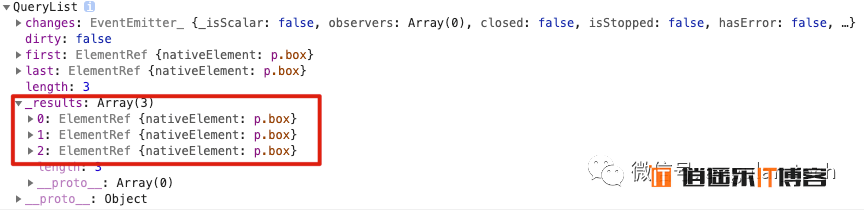
@ViewChildren('box') private boxEls: QueryList<ElementRef>;
ngAfterViewInit(): void {
console.log(this.boxEls);
}
...
}
(批量获取组件跟上面类似,就不介绍了)
总结
- ViewChild用于获取单个元素,ViewChildren可以批量获取元素;
- ViewChild默认不开启static,不能在constructor以及ngOnInit中获取元素;
- 如果想要获取的元素在页面上始终存在,没有被
ngIf之类的控制,或者想要更早获取的话,建议开启static - 获取组件可以通过模版标识或者组件类名来进行选择;
- QueryList下面有众多属性及一些方法,详细查看文档。
本文转载自:公众号 岩弈 Angular教程,版权归原作者所有,本博客仅以学习目的的传播渠道,不作版权和内容观点阐述,转载时根据场景需要有所改动。


最新评论