
准备工作
ng g m http-study
ng g c http-study -c OnPush -t -s
ng g s http-study/http-study
HttpStudyService :// http-study.component.ts
import {HttpStudyService} from './http-study.service';
...
constructor(private httpStudyServer: HttpStudyService) { }
...
HttpClient
HttpClient 提供各种向服务器请求数据的方法,返回一个可观察对象 Observable<any>。详见官网文档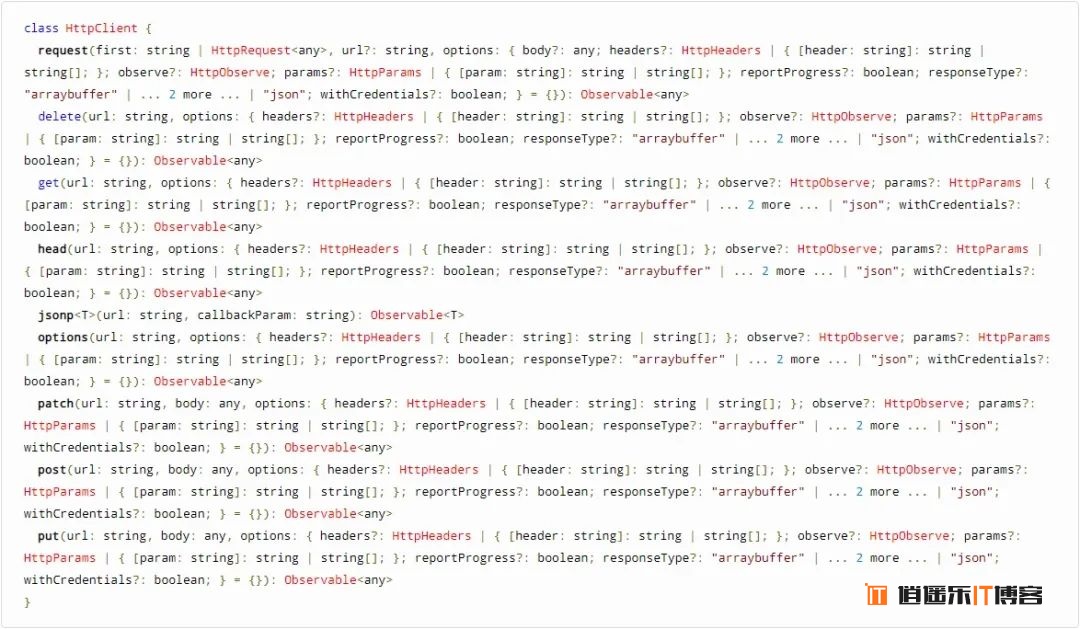
使用步骤
AppModule 中或者其他你想要的地方导入 HttpClient 服务类;import { HttpClientModule } from '@angular/common/http';
@NgModule({
imports: [
BrowserModule,
HttpClientModule,
],
...
})
HttpClient 服务注入成 HttpStudyService 的依赖项;// http-study.service.ts
import {HttpClient} from '@angular/common/http';
@Injectable()
export class HttpStudyService {
constructor(private http: HttpClient) { }
}
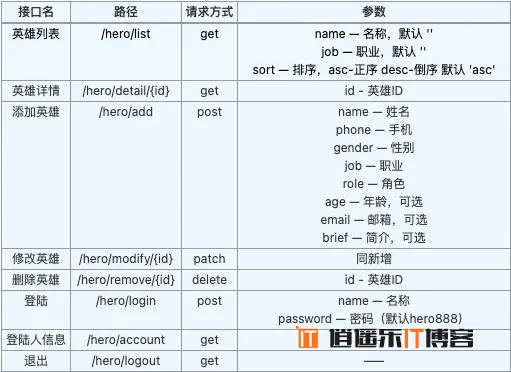
HttpClient 的方法从服务器请求数据。this.http.get('http://localhost:3333/hero/list');
解决本地开发跨域问题
3333 端口,但是,我们的程序在 4200 端口。直接请求数据,毫无疑问会有跨域的问题。- 在项目的
src/目录下创建一个proxy.conf.json文件。 - 往这个新的代理配置文件中添加如下内容:
{
  "/api": {
    "target": "http://localhost:3333",
    "secure": false,
    "pathRewrite": {
      "^/api": ""
    }
  }
}
tips:这个文件表示:当你访问 '/api' 开头的路径时,将会实际访问 //localhost:3333/api ,但是接口是不带有 'api' 的,所以需要 pathRewrite ,在实际请求时将 '/api' 替换成空。
- 在
CLI配置文件angular.json中为serve目标添加proxyConfig选项:
...
"architect": {
  "serve": {
    "builder": "@angular-devkit/build-angular:dev-server",
    "options": {
      "browserTarget": "hero:build",
      "proxyConfig": "src/proxy.conf.json"
    },
...
- 要使用这个代理选项启动开发服务器,或修改了代理配置,都应该重启环境。
如果你要访问的后端服务器不在 localhost 上,还要设置 changeOrigin 选项:
{
  "/api": {
    "target": "http://localhost:3333",
    "secure": false,
    "pathRewrite": {
      "^/api": ""
    },
    "changeOrigin": true
  }
}
这样,我们就能以 '/api/hero/list'这样的路径访问到本地跨域的服务器了。
但是又出现了另一个问题,在本地开发中我们给路径添加了 '/api' ,但是线上环境可能不需要这个啊。所以,我们需要区别程序运行环境来动态添加路径。
配置应用环境
在我们使用 cli 创建应用的时候,就自动生成了一个 environments 文件夹,里面的两个文件就包含了两个基础的应用环境配置。
environment.ts 包含了默认的环境设置。当没有指定环境时,build 命令就会用它作为构建目标。// environment.ts
export const environment = {
production: false
};
environment.prod.ts 里面的配置进行构建。// environment.prod.ts
export const environment = {
production: true
};
angular.json 中的每个构建目标下都包含了一个 fileReplacements 字段。这能让你把任何文件替换为针对特定目标的版本。
这表示在运行 用 ng build --prod 或 ng build --configuration=production 命令时用 environment.prod.ts 替换 environment.ts。
基于上面的原理,我们就可以根据环境配置 http 请求的一个基础路径。
/api 开头:// environment.ts
export const environment = {
production: false,
baseUrl: '/api'
};
// environment.prod.ts
export const environment = {
  production: true,
  baseUrl: ''
};
// http-study.service.ts
import {environment} from '../../environments/environment';
...
this.http.get(environment.baseUrl + '/hero/list');
...
url 始终是真实的路径。get() 方法
Observable,当它被订阅时,会要求服务器执行配置好的 GET 请求。get(url: string[, options: object]): Observable<any>
options: {
    headers?: HttpHeaders | {[header: string]: string | string[]},
    observe?: 'body' | 'events' | 'response',
    params?: HttpParams|{[param: string]: string | string[]},
    reportProgress?: boolean,
    responseType?: 'arraybuffer'|'blob'|'json'|'text',
    withCredentials?: boolean,
  }
params 参数,接受 HttpParams 类型或者键值对形式的对象。来看 HttpParams :HttpParams类
用来表示序列化参数,它们的 MIME 类型都是 application/x-www-form-urlencoded。
class HttpParams {
  constructor(options: HttpParamsOptions = {} as HttpParamsOptions)
  has(param: string): boolean
  get(param: string): string | null
  getAll(param: string): string[] | null
  keys(): string[]
  append(param: string, value: string): HttpParams
  set(param: string, value: string): HttpParams
  delete(param: string, value?: string): HttpParams
  toString(): string
}
使用 HttpParams 来序列化参数,获取英雄列表:
// http-study.service.ts
private prefix = environment.baseUrl + '/hero/';
getList(): Observable<Hero[]> {
  return this.http.get(this.prefix + 'list').pipe(
    map((res: Base<Hero[]>) => res.data)
  );
}
调用方法时一定要订阅才会发送请求:
// http-study.component.ts
getList(): void {
  this.httpStudyServer.getList().subscribe(data => {
    console.log(data);
  });
}
这样,我们就能获得全部的英雄列表。
当然,我们也可以使用 set() / append() 方法传参:
// http-study.service.ts
getList(): Observable<Hero[]> {
  const params = new HttpParams().set('name', '卡特').set('sort', 'desc');
  // const params = new HttpParams().append('name', '卡特').append('sort', 'desc');
  return this.http.get(this.prefix + 'list', {params}).pipe(
    map((res: Base<Hero[]>) => res.data)
  );
}
他们两者之间的区别是: set() 是替换参数值, append() 是追加参数。其他方法也能见名知意,就不赘述。
但是这样的形式进行传参未免太繁杂,我们也可以使用 fromString 变量从查询字符串中直接创建 HTTP 参数:
const params = new HttpParams({fromString: 'name=卡特'});
这里,为了转换对象为 'name=卡特' 形式,我们需要引入一个方法:
// http-study.service.ts
import {stringify} from 'querystring';

getList(args: HeroArg): Observable<Hero[]> {
  const params = new HttpParams({fromString: stringify(args)});
  return this.http.get(this.prefix + 'list', {params}).pipe(
    map((res: Base<Hero[]>) => res.data)
  );
}
调用时传入参数:
// http-study.component.ts
getList(): void {
  this.httpStudyServer.getList({name: '卡特', job: '', sort: 'desc'}).subscribe(data => {
    console.log(data);
  });
}
处理请求错误
程序中发生错误通常会有两种情况:
- 服务器端发生错误,可能是服务器拒绝访问或直接报错;
- 客户端发生错误,可能网络错误什么的造成的。
针对不同的错误类型,我们需要定制不同的错误处理逻辑。
// http-study.service.ts
getList(args: HeroArg): Observable<Hero[]> {
  const params = new HttpParams({fromString: stringify(args)});
  return this.http.get(this.prefix + 'list', {params}).pipe(
    map((res: Base<Hero[]>) => res.data),
    // 抛出错误
    catchError(this.handleError)
  );
}
private handleError(error: HttpErrorResponse) {
  // 根据自己项目实际情况判定
  if (typeof error.error?.code === 'number') {
    console.error(`服务器端发生错误,状态码:${error.error.code}`);
  } else {
    console.error('请求失败');
  }
  return throwError(error);
}
这样在服务中制定错误处理逻辑可以方便复用代码,当然,我们也可以在调用接口时使用 subscribe 的第二个参数进行定制专属错误提示。
RxJs 的重试操作符 retry 来重新发送请求:// http-study.service.ts
getList(args: HeroArg): Observable<Hero[]> {
const params = new HttpParams({fromString: stringify(args)});
return this.http.get(this.prefix + 'list', {params}).pipe(
map((res: Base<Hero[]>) => res.data),
retry(3), // 重试3次,一共会发送4次请求
catchError(this.handleError)
);
}
添加请求头
设置请求头也是日常开发中常见的操作。Angular 提供了 HttpHeaders 类来配置请求头。
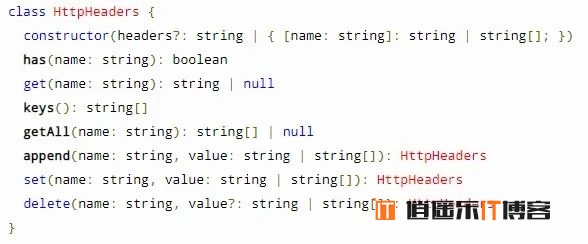
里面的方法跟 HttpParams 类似,set() 方法用于添加或更新:
// http-study.service.ts
getList(args: HeroArg): Observable<Hero[]> {
const params = new HttpParams({fromString: stringify(args)});
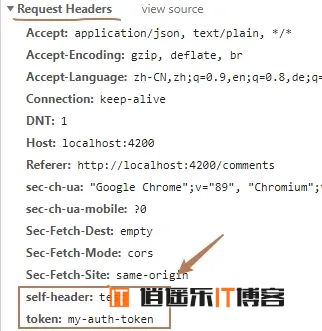
// 定义请求头
const headers = new HttpHeaders({token: 'my-auth-token'}).set('self-header', 'test');
return this.http.get(this.prefix + 'list', {params, headers}).pipe(
// ...
);
}
对于其他的请求方式这里就不打算介绍了,大同小异,需要的时候看文档就够
作为基础章节,我们就介绍这么多。下一节将继续介绍 http 的进阶使用,敬请期待~


最新评论