
开发环境及内容
- Angular11
- angular-calendar
- 自定义 Pipe 修改日期內容
需求
目前日期组件中的日期当我选到一个日期的时候,会显示如下图。
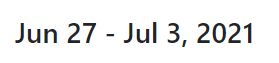
但项目需求要改成 2021, 6/27 - 7/3。
处理流程
首先这是套件已经封装好的日期格式,再通过观察发现只有在week的时候会显示日期范围的呈现,所以变成我要改成自定义的方式,这时前辈的提点说可以使用Pipe来转换显示。
建立 Pipe
基本的 date pipe 可以看 Angular教程 - Pipe 管道:date日期格式化转换
那这边要通过自定义的Pipe才能转换日期格式,首先,我们建立一个pipe的ts档案,命名为为 weekRange.pipe.ts。
- 先输入
@Pipe通过只能提示,会出现选项,然后它是一个 function,里面是一个对象,key是name,value是这个pipe在 HTML 要使用的名字,是字符串。 - 要 export 这个 pipe,创建一个类,如这里命名test,并且用
PipeTransform来实现。 - 里面要用 tranform 的方法,参数就是我们要转换的
date。
import { Pipe, PipeTransform } from "@angular/core";

@Pipe({
  name: "test",
})
export class test implements PipeTransform {
  transform(date: string) {}
}
到这里我们就完成基础设置,pipe的创建
记得要去 app.module.ts 的 declaration 中导入 pipe。
具体导入的位置以实际为准
取到日期并开始分割它
我们先把日期数据输出到console,看看它是个什么样的
console.log

确认取到的格式是正确的,我们继续
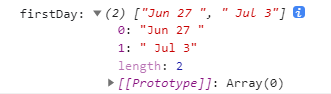
使用 split 分割
let time = date.split(",");
console.log("time:", time); // 会得到一个数组
我们会得到一个数组,如下图。

这时候我已经取到年份了,再来我要处理月跟日。所以我先把年先存起来。然后刚刚可以观察到两个日期中间有一个 横线 作为连接,所以要把这个去掉。
const year = time[1]; //年
const firstDay = time[0].split("-");
console.log("firstDay:", firstDay);
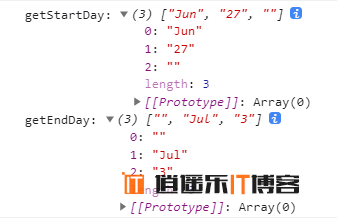
一样使用 split() 将 横线两边的字串取出,又会得到一个数组。
会发现月跟日中间有一个空白,也是用 split() 去分割字符串,并且用变量将其存取。这样我就有开始月跟结束月以及开始日跟结束日。
const getStartDay = firstDay[0].split(" ");
const getEndDay = firstDay[1].split(" ");
console.log("getStartDay:", getStartDay, "getEndDay:", getEndDay);
取到需要的字符串
已经将字串处理好之后,剩下的就是组合了,所以我依序按照数组的排序取得我要的字串内容。
//* 取到字符串
const startMonth = getStartDay[0];
const startDay = getStartDay[1]; //6
const endDay = getEndDay[2];
const endMonth = getEndDay[1]; //6 or 7
将英文的月份转成数字
使用两个函式,并且用 switch 去转换起讫月的格式。
getStartMonth(startMonth: string) {
        let month = "";
        switch (startMonth) {
            case "Jan":
                return (month = "1");
            case "Feb":
                return (month = "2");
            case "Mar":
                return (month = "3");
            case "Apr":
                return (month = "4");
            case "May":
                return (month = "5");
            case "Jun":
                return (month = "6");
            case "Jul":
                return (month = "7");
            case "Aug":
                return (month = "8");
            case "Sep":
                return (month = "9");
            case "Oct":
                return (month = "10");
            case "Nov":
                return (month = "11");
            case "Dec":
                return (month = "12");
        }
    }

    getEndMonth(endMonth: string) {
        let month = "";
        switch (endMonth) {
            case "Jan":
                return (month = "1");
            case "Feb":
                return (month = "2");
            case "Mar":
                return (month = "3");
            case "Apr":
                return (month = "4");
            case "May":
                return (month = "5");
            case "Jun":
                return (month = "6");
            case "Jul":
                return (month = "7");
            case "Aug":
                return (month = "8");
            case "Sep":
                return (month = "9");
            case "Oct":
                return (month = "10");
            case "Nov":
                return (month = "11");
            case "Dec":
                return (month = "12");
        }
    }
组合成需求要的显示格式
使用模板语法呈现此时间格式。
return `${year}, ${this.getStartMonth(
  startMonth
)}/${startDay} - ${this.getEndMonth(endMonth)}/${endDay}`;
然后到这里就算是完成了。你学会了?


最新评论